How to increase/decrease the size of the Recycle Bin in Windows 8, Windows 7 and Windows XP
Modify size of the recycle bin in Windows 8 – will show you how to increase/decrease the recycle bin size so that it will able to store more data in the recycle bin of Windows 8, Windows 7 and Windows XP. You can also delete the files without sending to recycle bin in Windows.
Whenever we delete anything (files/folder) from our system drive and it will move to recycle bin. Then that file is not actually deleted. It moves to the recycle bin and occupy the same memory from that Windows drive (Hard disk). But hidden from the Windows drive and visible in Recycle Bin. So if we are deleting more files and moving them to recycle bin then we need to increase the size of the recycle bin. But if you are thinking that the unused files are increasing in recycle bin then decrease recycle bin size to get more space in Windows drive.
Also Check: How to hide all the icons in Windows 7 desktop
How to increase/decrease the size of the recycle bin in Windows
1. Open “Recycle Bin“.
2. Right Click of mouse on an empty space of Recycle bin and choose “Properties” to open “Recycle Bin properties“.
3. Now select the drive, whose recycle bin size you want to increase/decrease.
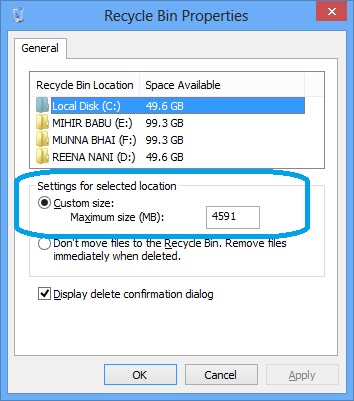
4. You will get an check-box “Custom Size – Maximum Size in MB” on “setting for Selected Location”.

Increase decrease the recycle bin size in Windows 8
5. Just select that check-box and enter the size of the recycle bin for that Windows drive in MB. It will modify the recycle bin size for that drive.
6. Now “Apply” all the changes and click on “OK“.
7. That is it. Now the size of the recycle bin in Windows is modified for the selected drive. To modify the size of the recycle bin for each drive you need to complete the each step for every drive individually.
Also Check: Priyanka Chopra’s Exotic HD video